- Products & Services TokuProfile Spectral Flow CytometryWhole Blood KitTokuProfile Mass CytometryData
- Resources
- Pricing
- Company
- Login
Articles
How are your antibodies validated?
Published by Teiko.bio January 5, 2024 (4 min read)
In short: We validate antibodies by testing different antibody clones, concentrations, and cellular conditions to optimize signal-to-noise ratio and reduce background noise, ensuring accurate identification of cellular markers. For the full details, download our technical whitepaper ‘Panel and Custom Antibody Validation Process‘ to learn more!
Our customers often want to know that when we have a cellular marker on our panel, such as CD45, we can confidently distinguish this cellular marker signal from background noise. To detect a cellular marker, we need a corresponding clone.
But not all clones are created equal. For instance, here’s an example of two different CD45 antibody clones tested on human cells with very different results. Can you see the difference?
| Bad signal: cellular population missing or too low | Good signal: cellular population found |
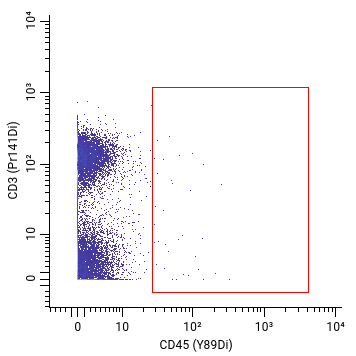 | 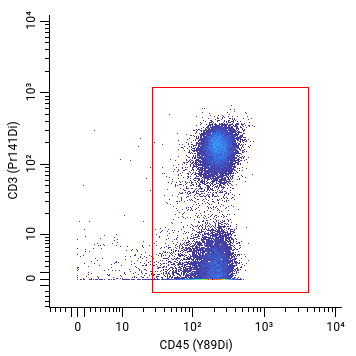 |
To that end, our immunologists use their extensive expertise to reduce mass cytometry panel validation time from months to weeks, using proven techniques.
Problems with standard approaches:
Traditional approaches would use panel design software alone to assign markers to channels, however standard panel design software approaches have crucial limitations. Specifically, these approaches:
- only work with markers sold by the manufacturer
- leave the antibody clone, antibody concentration, and stimulation condition unspecified for markers not sold by the manufacturer
Imagine you need a marker that’s not sold by the manufacturer: at this point, you need an expert to figure out what the right clone and concentration is. And if you don’t happen to have an expert handy, and you get the wrong clone or concentration: that could yield “bad or missing signals” on a panel, and ultimately unuseable data for precious samples.
Now, let’s compare our approach.
Our process:
We pair the best of software design with expert scientist intuition. Teiko scientists and immunologists have collectively processed over 2,800+ samples and 25 panels, yielding many hard-won lessons about panel design.
Ultimately, for a 44-marker panel, the goal of this process is to produce a 44 X 5 table:
| Marker | Channel [44 total] | Antibody Clone | Antibody Concentration (μg/ml) | Cellular conditions for signal detection |
| CD45 | [89Y, 112Cd, …, 209Bi] | [C1, C2, … CN] | [6, 3, 1.5, … 0.1875] | [Stimulated PMA, Stimulated PHA, Unstimulated] |
| CD8a | [89Y, 112Cd, …, 209Bi] | [C1, C2, … CN] | [6, 3, 1.5, … 0.1875] | [Stimulated PMA, Stimulated PHA, Unstimulated] |
| … | … | … | … | … |
| CD45RA | [89Y, 112Cd, …, 209Bi] | [C1, C2, … CN] | [6, 3, 1.5, … 0.1875] | [Stimulated PMA, Stimulated PHA, Unstimulated] |
The first thing we do is look at the literature and antibody vendors and see if a marker of interest has been tested before. For each marker, i.e. CD45, we’ll figure out which antibody clone (i.e. HI30) to use based on historical performance.
Then, we’ll determine which channel to use to get the “maximum” signal to noise ratio. In general, Teiko’s experts follow a few rules that sound simple but require a lot of knowledge to execute quickly:
- If a marker is weakly expressed on the cells, we put that marker on a “bright” channel to get a good signal.
- Similarly, if a marker is strongly expressed on the cells, we put that marker on a “dim” channel to prevent the signal from becoming too “overwhelming”.
- Some metals shouldn’t be matched on the same cell population because of concerns for natural impurity, and we won’t put those metals together.
Our experience with channel placement is where our experts can save you weeks of time and frustration.
After finding the right channel, we determine the “optimal” antibody concentration to get the maximum separation between signal and noise. We plot this “stain index” on a curve to find the right concentration.
This is how we generate the stain index:
- First, we determine whether the marker needs to be tested in unstimulated or stimulated cells based on whether the marker is expressed on immune cells at baseline. If stimulation is required, we always test two different biological stimulations.
- Next, we test six different concentrations of antibody and at each concentration we check:
- Strength of the signal
- Presence of background noise
- “Spillover” (false-positive) signal into other channels
- When a marker calls for it, we focus our analysis on a specific population that expresses that marker, so we don’t underestimate the signal.
- Finally, we check that our marker performance is comparable to what others have seen in literature.
The end result is a fully populated table and completed validation:
| Marker | Channel [44 total | Antibody clone | Antibody Concentration (μg/ml) | Cellular Conditions for Signal Detection |
| CD45 | 89Y | C2 | 1.5 | Unstimulated |
| CD8A | 209Bi | C1 | 0.1875 | Unstimulated |
| … | … | … | … | … |
| CD45RA | 112Cd | C3 | 3 | Stimulated PMA |
What is your process for validating new antibodies and adding them into my customized panel?
Using a process very similar to how we validated our base panels, we verify the optimal staining concentration at which each metal-conjugated antibody demonstrates a detectable and accurate signal on the mass cytometer, while minimizing background signal and spillover into other channels. Once titrated and validated individually, these antibodies are added to the panel and the full panel is then validated.
In sum
That’s a lot of heavy lifting behind the scenes. And we do that in weeks, not months. Teiko scientists performed this process to design all of our current Custom backbone and Standard panels.
Want to dive into the technical details? Download our technical whitepaper ‘Panel and Custom Antibody Validation Process‘ to learn more!